

Most people shopping for a Starlink Ethernet adapter do not need one. Which router sits in your house decides the answer, not which dish is on your roof, and three of the four current kits already have a wired port on them. Nationwide Installation Techs, (877) 309-1050.
There is exactly one current kit that cannot make a wired connection without buying a part. If you own anything else, the money is better spent on the cable run than on the adapter, and the rest of this page is about telling those two situations apart. The confusion is worth explaining, because it is not the reader’s fault. Starlink shipped a router with an Ethernet port in 2020, removed the port in the 2021 hardware and sold an adapter to put it back, then returned two ports to the 2023 router and made the adapter unnecessary again.
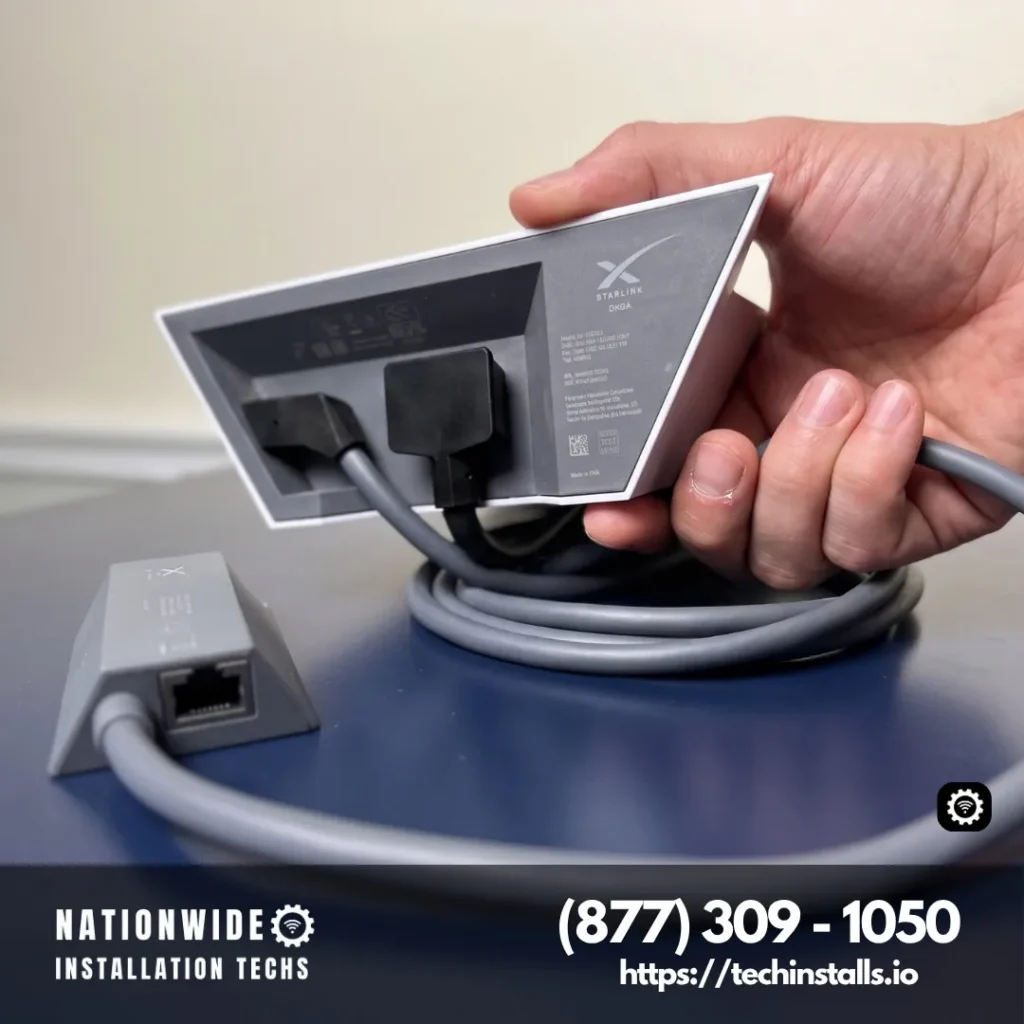
Four generations, three different answers. So the question “which Starlink Ethernet adapter do I need” has no single answer until you know which box you own, and the fastest way to find out is to look at the back of the router rather than at the dish. Before you buy anything at all, run a test on speedtest.net over Wi-Fi and then think about what a cable is actually going to fix, because a wired run solves latency and congestion at one device and does nothing whatsoever for a dish that cannot see the sky.
Choosing a Starlink Ethernet Adapter Without Buying the Wrong One
Here is the whole decision, ahead of the detail. This is how our expert installers answer it on the phone, and for most callers it ends the conversation:
- Gen 3 router, the one in the current Standard kit. Two RJ45 LAN ports under the rubber cover on the back. Buy nothing.
- Gen 2 router, Standard Actuated or older High Performance. No ports. This is the one kit that needs the inline Ethernet adapter.
- Starlink Mini. One latching Ethernet LAN port that takes the Starlink plug. Buy the cable that latches, not a bare patch lead, and keep the seal intact if it lives outdoors.
- Performance Kit. The Advanced Power Supply has both a LAN port and a high-power PoE port on it, and the kit ships with a five metre Ethernet cable in the box. Buy nothing.
- Gen 1 router, circular dish. One built-in port. If you are taking the free Router Mini replacement, plan the cable into its WAN port.
One case is missing from that list and it catches people out. If you have a Standard Actuated dish and you add a Gen 3 Router to it, the router does not become your main router by default. It pairs as a mesh node. Starlink’s own setup guide for that combination is explicit that to run it as the base router instead, you need the Ethernet adapter and the supplied cable. So adding newer hardware to an older dish does not get you out of buying the part.
Two specifications are worth checking on any third-party part, and only two. The first is whether the connector actually latches, for the sealing reason set out below. The second is whether it is rated for gigabit, because a hundred-megabit part will quietly cap a connection that the current hardware can run well past. Everything else in those product listings is noise.
Cable length is the other thing people ask about and it is rarely the constraint they expect. Ethernet runs to 100 metres before you need anything clever, which is far further than the inside of a house. If the distance you are worried about is to a detached garage, a shop or a second building, the honest answer is usually that a cable is the wrong tool and a point-to-point wireless bridge is the right one, because it does not need a trench.
Start With the Router, Not the Dish
The dish is not where the wired connection happens on a standard residential setup. Power and data both run up one proprietary cable to the antenna, and the Ethernet question is decided at the other end of that cable, at the router or the power supply. This matters because people describe their setup by the dish they can see. “I have the rectangular one” and “I have the round one” are useful answers, but the router is the part that determines whether you need to buy anything.
Turn the router around and look for an RJ45 jack, the same shape as the connector on any computer network cable. On the 2023 router it is behind a soft rubber cover on the back panel and is easy to miss entirely, which is the single most common reason somebody buys an adapter they already had the equivalent of. If there is a jack, you are done. If the back of the box is smooth except for the proprietary connectors, you have the 2021 generation and you need the part.
The Only Kit That Needs the Official Starlink Ethernet Adapter
The Gen 2 router, the one that shipped with the Standard Actuated rectangular kit and with the older High Performance kit, has no Ethernet ports on it at all. That is the whole reason this product exists. The adapter is a short inline dongle: it opens the run between the dish cable and the router, passes the signal through, and gives you one RJ45 socket hanging off the side of it.
Three practical notes our experienced technicians run into on these:
- One port means one port. If you need to feed a desktop, a smart TV and a network printer, put a small unmanaged switch on the end of the adapter. That works fine and costs less than most of the multi-port adapters being sold.
- It sits indoors, on the router end. It is not a weatherproof part and it is not something to splice into the run outside. If the cable enters the house low on a wall, as ours do, the adapter lives next to the router and not at the entry point.
- It has to be installed in line, so the connection drops while you do it. Two minutes, and the dish reboots afterward. Nothing to worry about, but do not do it during a call.
The Mini Has a Port That Is Not an RJ45 Jack
This is the one that catches people, and it is worth being precise about. The Starlink Mini specification sheet lists its network hardware as “One (1) Latching Ethernet LAN port with Starlink Plug.” Read that carefully. There is a genuine Ethernet LAN port on the Mini, so in one sense it needs no adapter at all. But the socket takes Starlink’s own latching plug, not a bare RJ45 connector, so an ordinary patch cable off the shelf will not go into it.
What that means in practice is that a Mini owner is buying a cable or a coupler rather than an adapter, and the distinction matters for one reason: the seal. The Mini’s environmental rating is listed as “IP67 Type 4 with DC Power Cable and Starlink Plug/Cable installed.” The rating is conditional on the correct plug being in the socket. Put a bare RJ45 in there, or a coupler that does not seat and latch properly, and the unit is no longer sealed to that standard. On a Mini mounted outdoors, which is most of them, that is not a specification detail, it is where the water gets in.
So if the Mini is under cover, on a porch or inside a vehicle, a third-party coupler is a reasonable thing to use. If it is out in the weather, use the part that latches and keeps the seal.
There is a whole category of third-party adapters aimed at exactly this, usually marketed as V3 or Gen 3/Mini adapters, and the better ones put the RJ45 junction inside a weather-rated housing rather than leaving a bare connector hanging on the outside of the unit. That is the right idea. On RV and off-grid installs, where the Mini is genuinely exposed and the whole point is to run a cable to gear inside the vehicle, a sealed housing is worth more than the few dollars it adds. Just be aware that whatever the listing claims, the rating on the Mini itself is specified with Starlink’s own plug fitted, so an aftermarket housing is protecting the joint, not restoring the manufacturer’s figure.
What the Gen 1 Router Retirement Changed
In November 2025 Starlink told owners of the first-generation router, model UTR-201, that it would stop receiving software updates, and offered a free Router Mini as a replacement. The old router still passes traffic, but an unpatched router on the edge of a home network is a security question rather than a performance one, so most people should take the replacement.
There is a wrinkle in it that belongs in a guide about wired connections. The Gen 1 router had a single built-in Ethernet port, so circular dish owners have had a wired option all along and have never needed this product. The replacement Router Mini connects to a circular dish over Ethernet into its WAN port. So the retirement turns a group of people who never had to think about cabling into a group who suddenly have to get a cable right, which is the opposite of what a free upgrade usually does. If you are in that group, the part you need is a cable and possibly a coupler, not the inline adapter sold for the Gen 2 router.
Bypass Mode Is a Separate Decision From the Adapter
Plenty of people arrive at the adapter question by way of a different one, which is how to put their own router in charge. Bypass mode turns off the Starlink router’s Wi-Fi and its routing, hands the connection to your equipment, and clears up the double-NAT that otherwise sits between your devices and the internet.
The two situations are not the same, and conflating them is how money gets spent unnecessarily:
- On the Gen 3 router, bypass needs no adapter. The two LAN ports stay live in bypass mode even though the Wi-Fi is switched off, so your own router plugs straight into one of them.
- On the Gen 2 router, bypass requires the adapter, because with the Wi-Fi disabled and no Ethernet jack on the box there is no remaining path to your equipment at all. Here the adapter is not a convenience, it is the whole mechanism.
Before you switch it on, know that bypass is not a toggle you can flip back. Starlink’s own router documentation states that a factory reset is required to exit bypass mode. Turning it on takes a moment in the app; turning it off means resetting the router with a paper clip in the reset button and setting the network up again. That is not a disaster, but it is worth knowing before you try it on a Sunday evening with the household waiting.
The router light tells you where you are, and this is the fastest diagnostic on the whole system. Violet means bypass mode is active. Solid white means connected, and the light switches itself off after an hour. Flashing white means it is still trying, and it will turn red if it cannot get online within twenty minutes. Red means no connection. No light at all means no power, which is usually a socket rather than a fault.
If your goal is a mesh system covering a large house, note that going to bypass mode means the Starlink mesh units stop working, since they pair with the Starlink router’s radio. That is a fair trade for most people running their own gear, but it is a trade, and it is better to know before the boxes are open than after.
When You Do Not Need Any Adapter at All
Being straight about this costs us nothing. A wired connection fixes a specific and fairly narrow set of problems, and if you do not have one of them, the adapter will not change your experience:
- You want lower latency for gaming or trading at one machine. A cable genuinely helps here, and it is the strongest reason on this list.
- Your Wi-Fi is congested in a dense building. A cable takes the important device off the air. Also genuinely helps.
- You want your own router, firewall or VPN gateway in charge. Legitimate, and covered above.
And the cases where it will not help, which are more common than the ones above. If the dish has an obstructed view, cabling changes nothing, because the problem is between the antenna and the satellite. If the whole house feels slow at peak hours, that is the shared cell overhead and a cable at one device does not add capacity. If Wi-Fi is weak at the far end of the house, the fix is a mesh node or a better-placed router, not a wired run to the room that already works. And if you are on a Mini running on battery, adding wired gear to the setup adds draw to a power budget that is usually the binding constraint already, since the Mini’s own consumption is listed at an average of 25 to 40 watts against 75 to 100 for the Standard.
Where We Stop
The limits are the same on a networking job as on a mount, and they are worth stating:
- We do not sell you a Starlink service plan or open the account. You hold that yourself, and you own the hardware.
- We do not run new electrical circuits or do anything that needs an electrical licence. If a job needs an outlet where there is not one, that is an electrician’s work and we will say so.
- We do not fish cable inside finished walls in a way that requires opening and patching drywall as a trade. Our professional installers route cleanly along accessible paths, and where that is not possible we tell you before we start rather than after.
- We do not administer your network afterwards. We will hand it over working, documented and tested, but ongoing firewall and VPN management is somebody else’s ongoing job.
- We do not modify Starlink hardware, open sealed assemblies, or fit anything that would put the manufacturer’s warranty on your kit at risk.
Starlink Ethernet Adapter: Frequently Asked Questions
Only one: the Gen 2 router that shipped with the Standard Actuated rectangular kit and with the older High Performance kit. It has no Ethernet ports, so the inline adapter is the only way to make a wired connection. The current Gen 3 router has two LAN ports built in, the Performance Kit’s power supply has a LAN port and a PoE port, and the Starlink Mini has a latching Ethernet port on the unit. Those three need a cable at most.
Yes, two of them. They are RJ45 jacks on the back panel, hidden under a soft rubber cover that lifts off, which is why people often conclude the router has none. Either port works for connecting a computer, a switch or a third-party router, and both stay active in bypass mode.
Not directly. The Mini’s specification sheet describes its port as one latching Ethernet LAN port that takes the Starlink plug, so a standard RJ45 connector will not seat in it. You need the Starlink Ethernet cable or a coupler made for that socket. This matters beyond convenience: the Mini’s IP67 Type 4 rating is stated as applying with the DC power cable and Starlink plug installed, so an improper connector on a Mini mounted outdoors compromises the weather seal.
It depends on which Starlink router you have. On the Gen 3 you do not, because bypass mode leaves both LAN ports working and you plug your router into one of them. On the Gen 2 you do, because switching off its Wi-Fi leaves no other wired path out of the box. Either way, be aware that bypass mode stops Starlink mesh nodes from working, since they pair to the Starlink router’s own radio.
Look at the light on the router. Violet means bypass mode is active. Solid white means a normal connection, and that light turns itself off after about an hour. Flashing white means it is still trying to connect and will go red if it fails to get online within twenty minutes. The important part is the second half of the question: a factory reset is required to exit bypass mode. You cannot simply toggle it off in the app the way you turned it on, so treat enabling bypass as a decision rather than an experiment.
The Gen 1 router had one built-in Ethernet port, so you have had a wired option and never needed the adapter. Starlink announced in November 2025 that this router stops receiving software updates and offered affected owners a free Router Mini. If you have a circular dish, the replacement connects to it over Ethernet into the Router Mini’s WAN port, so plan for a cable of the right length rather than buying the inline adapter sold for the Gen 2.
Not on a residential kit. The dish takes power and data over Starlink’s own proprietary cable, and the RJ45 ports on the routers are ordinary LAN ports for your devices. The Performance Kit is the exception worth knowing about: its Advanced Power Supply is rack-mountable, runs on AC or DC, and carries a high-power PoE port alongside its LAN port, which is one of the reasons that kit turns up in commercial and industrial installs rather than houses.
Standard copper Ethernet is good to 100 metres, which comfortably covers any run inside a house and most runs to an outbuilding on the same property. Beyond that, or where the run would have to cross a driveway or open ground, a point-to-point wireless bridge is usually the cheaper and tidier answer, because it removes the trenching. Our experienced technicians will tell you which of the two your site actually calls for before quoting either.
Yes. Cable routing, the entry point, the drip loop, the interior wall plate and the handoff to your router are all part of a residential installation, which starts at $385. A free virtual survey will usually settle whether your site needs a wired run at all; an on-site survey is $199. Full figures are on our Starlink installation cost page, including commercial at $750 per site and $650 each at three or more.
About Nationwide Installation Techs
Nationwide Installation Techs LLC is a professional, insured satellite installation company operating in all 50 states, with over 3,000 installations completed and a 4.9-star Google rating from 90+ reviews. Our experienced technicians cover residential, commercial, RV and marine installations, along with mesh networking, point-to-point bridges and on-site repair. We are an independent installer: you own your hardware and hold your own service account, and our crews handle the mounting, sealing, cabling and setup.
Working in every state listed on our locations we serve page. Call (877) 309-1050.
Contact Information
Nationwide Installation Techs LLC
- Phone: (877) 309-1050
- Email: support@techinstalls.io
- Free Quote: Contact Us Form
Connectivity News & Updates

Starlink Ethernet Adapter Guide: Picking the Right One for Your Setup
Only one current Starlink router needs the Ethernet adapter —...

Expert Entegra Odyssey RV Starlink Installation | Serving Customers in all 50 States
Mounting Starlink on an Entegra Odyssey means working around a...

Starlink Installation for Mobile Fleets – Nationwide Service
Starlink installation for fleets of work trucks and vans, nationwide....

Starlink Installation for Tiny Homes and Rural Rental Properties
Starlink installation for tiny homes and rural rental properties: mounting,...
Disclaimer: Nationwide Installation Techs LLC is an independent business and has no affiliation or official connection with Starlink, SpaceX, or any of their subsidiaries or affiliates. We are not associated with, authorized, endorsed, or sponsored by these companies in any capacity. For official information, please visit the Starlink and SpaceX websites at www.starlink.com and www.spacex.com. The names “Starlink,” “SpaceX,” and any related trademarks, logos, or imagery are the exclusive property of their respective owners.
Any references to “certified” or “certification” on this website refer exclusively to Nationwide Installation Techs LLC’s proprietary in-house technician certification program. This training and certification process was developed by our company based on the experience and installation methods of professional technicians who have collectively completed more than 3,000 successful Starlink installations while maintaining an overall 4.9-star customer review rating. It is not affiliated with, issued by, approved by, or endorsed by Starlink, SpaceX, or any of their affiliates.